

Writing your first ChatGPT API using Nodejs (Typescript)
Leverage your coding skills to build your first AI-powered API


Introduction
AI is here to stay, and as software engineers seeking to build revolutionary products and services, it is important to know how to harness the power of AI to provide more value to users. In this article, I will be providing a simple guide on how to build a Typescript REST API that is powered by ChatGPT. I’ll also be explaining some ChatGPT AI concepts like temperature, model and max_tokens.
For this tutorial, we would be creating a simple API that generates fun facts and quotes based on the prompts we pass to it as a request query parameter. We would also be implementing caching using Node-cache to make our requests faster and save us the cost of making fresh requests to OpenAI whenever we have new requests from our users
So let’s jump right into it!
Step 1: Setup your Nodejs (Typescript) project
To setup a Nodejs project written in Typescript, simply create a folder where you’d like to hold your files, change directories to that folder in your command line interface and run:
npm init -y
This would create a package.json file in your project’s folder where you can install and manage your project’s dependencies
Afterwards, install the following packages by running:
npm i express ts-node dotenv
Then install the following dev dependencies:
npm i --save-dev typescript @types/express @types/node
To configure your project to run Typescript, enter the following in the script section of your package.json file:
"scripts": {
    "build": "tsc",
    "start": "ts-node app.ts",
    "web": "ts-node app.ts",
  }
Next, we need to setup Express in our app.ts file where our overview code will be written. The app.ts file should be in the root of your project:
const express = require("express");
const port = process.env.PORT || 5000;
const app = express();
app.use(express.json());

app.listen(port, () => {
  console.log(`App listening on PORT: ${port}`);
});
Step 2: Setup Routes and Controllers
To follow the MVC design pattern, we would be setting up routes and controllers in separate folders within our project.
For routes: Create a folder called routes and then create a routes.ts file with the following input:
const { Router } = require("express");
const router = Router();

router.get("/ai-quotes", getquotes_get);
Explanation: Our endpoint would be accessible when a user makes a GET request to /ai-quotes
For the controller: Create a folder called controllers and then create a controllers.ts file which would hold the function that would interact with OpenAI. There are two main ways this can be achieved:
By making direct API calls to the OpenAI GPT-3 API using fetch, request or axios
By using the recommended OpenAI package for Nodejs.
I have used both approaches previously and I can vouch for the second approach providing more accurate and smart responses to prompt so we would be going with the second approach.
To install the OpenAI package, run:
npm i openai
Then, in your controller/controller.ts file:
import handleErrors from "../../utils/handleErrors";
import handleSuccess from "../../utils/handleSuccess";
import {Request,Response} from "express";
import { Configuration, OpenAIApi } from "openai"

export const getquotes_get = async (req: Request, res: Response) => {
  try {
    const configuration = new Configuration({
      apiKey: process.env.OPENAPI_KEY,
    });
    const openai = new OpenAIApi(configuration);
    const response = await openai.createCompletion({
      model: "text-davinci-003",
      prompt: req.query.prompt,
      temperature: 0.9,
      max_tokens: 100,
    })
    res.status(200).json(handleSuccess(response.data.choices))
  } catch (error) {
    res.status(400).json(handleErrors(error));
  }
};
Explanation: In the controller function called getquotes_get above, we are making a GET request using the OpenAI package for Nodejs. We are importing the Configuration and OpenAPIApi.
The configuration contains our secret API key which we obtain from our OpenAI developer portal. We then store this API key as an environment variable in our project in the .env file.
The model, prompt, temperature and max_tokens parameters are all required by OpenAIApi. Here is a brief explanation of what each of them mean:
1) Temperature: This is the degree of creativity and uniqueness you want in your responses, on a scale of 0 to 1. A temperature of < 0.5 would give you bland and focused responses while a temperature of > 0.6 would give very creativity but random responses.
2) Model: OpenAI has different models for ChatGPT some of which include text-davinci-002, text-davinci-001, text-DaVinci-003, the most recent and powerful version being 003.
3) max_tokens: This is the total number of words you want your response from ChatGPT to contain. A 100-word response for an API fetching random quotes/fun facts seems ideal. However for your use case, the max_tokens can be more.
4) Prompt: This is the question you’re posing to ChatGPT which is the premise for the response you get. In this particular implementation, we are passing our prompt as a Request query parameter which makes it easy for us to make changes to our response without hard-coding our prompt into the code.
NB: Your handleSuccess and handleErrors should be functions from your utils folder that specify how you plan to handle errors or success responses from your requests.
Step 3: Implementing Caching (to optimize for speed and cost)
Making API calls to ChatGPT currently cost about $0.03 / 1K tokens where tokens are the numbers of words in each response. To optimize performance and cost in your API, it makes sense to implement caching such that we only make the request once for every interval of time.
We would be using node-cache to implement caching.
First, install node-cache:
npm i node-cache
Next, we create a middleware to manage all our caching instances.
To do this, create a middleware folder and then create a file called nodeCache.ts and enter the following code:
const NodeCache = require("node-cache")
import {Request,Response} from "express";
import handleErrors from "../../utils/handleErrors";
import handleSuccess from "../../utils/handleSuccess";

export const myCache = new NodeCache({ stdTTL: 86400});

export const nodeCachedData = async (req:Request, res:Response, next:any) => {
    try {
      const cachedData = myCache.get(req.originalUrl)
      if (cachedData) {
        res.status(200).json(
        handleSuccess(cachedData)
      )
      } else {
        next();
      }
    } catch (error:any) {
      res.status(404).json(handleErrors({
        message:"Something went wrong while caching"
      }));
    }
  }
Explanation: The code above instantiates a cache which first checks if the data being fetched from the req.originalUrl (in this case, the “/ai-quotes”). Our data is also being cached for 86400 seconds, or 24 hours (1 day).
Now that our caching middleware is setup, let’s add it to our routes.ts file so we check if we have data stored in our cache before calling the controller.
So our routes.ts file would be modified to look like this:
import { nodeCachedData } from "../middleware/caching/nodeCache";
const { Router } = require("express");
const router = Router();

router.get("/ai-quotes",nodeCachedData, getquotes_get);
Next, we would need to add the set portion of our cache within our controller such that once we’ve fetched data for the first time, our response is stored in the cache and we won’t need to make a fresh request anymore.
To set the cache, modify your controller.ts file to look like this:
import handleErrors from "../../utils/handleErrors";
import handleSuccess from "../../utils/handleSuccess";
import {Request,Response} from "express";
import { Configuration, OpenAIApi } from "openai"
import { myCache } from "../../middleware/caching/nodeCache";

export const getquotes_get = async (req: Request, res: Response) => {
  try {
    const configuration = new Configuration({
      apiKey: process.env.OPENAPI_KEY,
    });
    const openai = new OpenAIApi(configuration);
    const response = await openai.createCompletion({
      model: "text-davinci-003",
      prompt: req.query.prompt,
      temperature: 0.9,
      max_tokens: 100,
    })
    myCache.set(req.originalUrl,response.data.choices,86400)
    res.status(200).json(handleSuccess(response.data.choices))
  } catch (error) {
    res.status(400).json(handleErrors(error));
  }
};
And that’s it. Now we only make our first actual request to OpenAI every 24 hours, any request within that interval would serve up the initial cached response to our user.
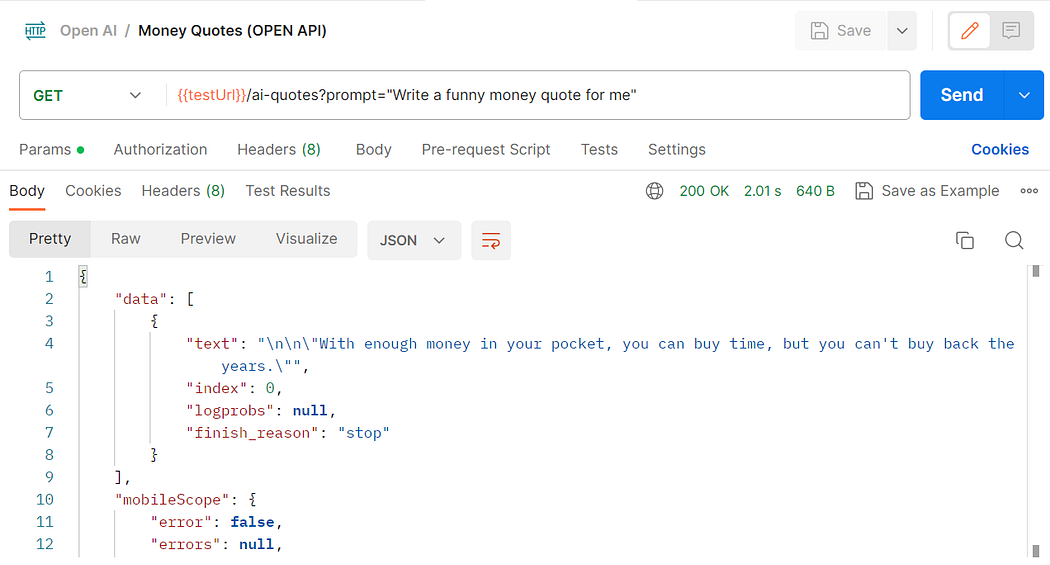
Here’s a demo of how the response from open would look like once you’ve successfully setup this project without any issues:
Conclusion
So that’s it! In just a few lines of code, we successfully wrote an API that interacts with ChatGPT using Nodejs and Typescript. AI brings endless possibilities to the types of features and delightful experiences we can provide to our users using code. Now, it’s up to you to let your imagination run wild and think up as many exciting use cases as possible.
Happy Hacking✌🏼
P.S : You can fork/ star the repository for this tutorial article here: https://github.com/Toheeb-Ojuolape/openai-tutorial